A contact is an individual or an individual in a company or organisation. Contacts may include suppliers, contractors, customers, billing/accounts targets, and employees. Either the contact’s name or organisation are required at a minimum to create a new Contact record.
A contact is unique to one company or organisation in Saasu. Specifically a contacts email is unique and legally belongs to one legal entity.
Adding a Contact
- Go to Add > Contact.
- Enter the name, email and phone number if required
- When you are setting up a contact you can attach a company to it.
Searching for a Contact
There are 3 ways to search for a contact in Saasu:
- Search Field – Type in the field in the top right in Saasu’s menu.
- Advanced Search – Click the people icon top left of Saasu’s menu.
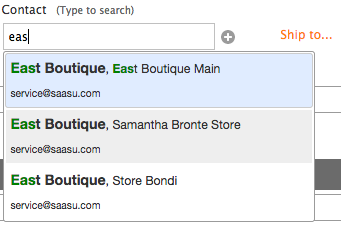
- Contact fields search – When entering transaction you can type the letters that your contact begins with or type the full information for a very targeted list. e.g. “M” versus “Marc”. You can search First Name, Last Name, Company Name and email in a Contact field.
Advanced Search options:
- Click the ‘more filters’ link if you wish to refine you search further.
- Choose between Active and Inactive contacts to display. Active Contacts are displayed in the results by default.
- Choose which Tags you want your list filtered by. See below; Filtering Your Contact List Using Tags.
If you wish to edit any of the contact information, select the contact name in question. This will take you to Edit Contact screen. The contact details will become available for editing.
To make an existing Contact inactive:
- Click Contact in the main menu.
- Tick the boxes on the left to choose the contact(s) you want to make inactive.
- Click on “Mark as inactive”.
To make an existing Contact active from inactive:
- Click Contact in the main menu.
- Select “More Filters”.
- Drop down to Inactive or All.
- Tick the boxes on the left to choose the contact(s) you want to make active.
- Click on “Mark as Active”.
Contact Information
- Given Name, Family Name – Enter the contact’s name here. You can leave this blank if the contact is an organisation. You could also enter an alias such as ‘Accounts’. This is useful when wanting to create a generic contact for sending Sales and Purchases to.
- Company/Organisation – Choose the contact’s organisation here or click the plus button so that you can setup a company or organisation to associate them with. One Company or Organisation can have multiple Contacts associated with it. You can leave this blank if the contact is an individual.
- Business Number – Enter the contact’s business number (if applicable for your zone).
- Email – Enter the contact’s email address here (only one email address is allowed). This email address is used as the default ‘To’ email address displayed in the Email Invoice window when you assign the contact to an invoice (you can still change the ‘To’ address in the Email Invoice form before you send the email).
- Website – Enter the website for this contact. The View Website link above this field will open a new tab and take you to the website. There is also a company website field when you setup the company record for this person so often you may wish to use this field for the persons personal blog or specific website address that is more relevant to them personally.
- Twitter ID – Enter the Twitter name for this contact. @ symbol often associated with a Twitter ID isn’t required. This information enables you to click the View Updates link above the Twitter ID filed to see a list of tweets by this person.
- Skype ID – Enter the skype name for this contact. This information is for your reference and isn’t used in Saasu at present.
- Main Phone, Home Phone, Other Phone, Mobile Phone, Fax – Enter the contact’s relevant phone numbers here. You can leave these options blank.
- Street – Enter the contact’s street address (i.e. “Level 7, 103 Acme Lane”).
- City, State, Post Code, Country – Enter the remaining details of the contact’s address.
- Contact ID – Is used as an Account or Contact reference for this person if they are a supplier or customer. This is your reference or their reference depending on how you prefer to use this field.
- Contact Manager – This is another Contact record in Saasu and is used to represent the Account Manager, Salesperson or similar for this Contact record.
- Custom Fields – Can be used to manage extra information Saasu doesn’t currently support that you require in your business to be associated with the contact records.
Contact Payment Instructions
- Direct Deposit / Electronic – enter the Contacts banking details for payments if required. DO NOT ENTER CREDIT CARD NUMBERS. This is used for ABA file creation on Purchase invoices.
- Cheque, payable to – When paying this counter-party, this field will be used for cheque printing when the feature becomes available.
Communications and Options
- Auto-send Statements – Check this box if you want Statements to be automatically sent to this Contact if they have any outstanding receivables with you.
- Partner – Check this box to have Contacts who are Partners of your business display with a “P” in Contact autocompletes ‘type to search’ boxes.
- Contractor – this check box can be used for your own purposes however it also has a specific bearing on the Taxable Payments Annual Report in the Australian zone. Learn more on the TPAR help note.
Filtering you Contact List using Tags
- Include All Tags – all records that have the tags selected from the tag cloud in the tag picker. So if tag A AND B is selected then all records that have A AND B assigned to them will be returned.
- Include Any Tags – any records that have the tags selected from the tag cloud in the tag picker. So if tag A AND B is selected then all records that have A OR B assigned to them will be returned.
- Exclude All Tags – all records that have the tags selected from the tag cloud in the tag picker. So if tag A AND B is selected then all records having A AND B assigned to them will be excluded.
- Exclude Any Tags – any records that have the tags selected from the tag cloud in the tag picker. So if tag A AND B is selected then all records having A OR B assigned to them will be excluded.
If you have a very long contact list you can set the “Do not display contact list on first view” preference to allow you to first set up your filters before displaying your list of contacts. Click On Settings in the top menu and choose Contacts to set this.
Companies
NOTE: Transactions in Saasu are linked to Contacts and not the Company directly
In Saasu a Company can have many contacts connected to them. There may be one specifically for billings such as Accounts Payable but also specific contact points such as a person, location, division or outlet representing the Company. ie. John Doe, Loading Dock X etc. These are Contacts.
Creating a Company
When you are setting up a contact you could setup the contact to belong to an company. If one isn’t already setup then click on the “+” icon next to company in the Add/Edit Contact screen. Enter a name for the company, a business number (if required) and the website address (if required) before saving it.
Add a Company as a Contact
When you want to enter transactions against a company, it will not be available in the contact pick list unless you add it as a contact. To add a company as a contact;
- Go into Add Contact screen.
- If the company is already available, select it from the Company pick list. If not, click on the green add icon adjacent to the company pick list, enter the details and click Save and Close.
- Fill in any other fields as required except First Name and Last Name.
- Click on Save and Close.
You have just created a company contact, and this particular contact will now appear in the contact pick list so that you can start entering transactions against it.
Multiple Contacts and Addresses per Company
Create a main contact and then create sub-contacts.
Note: a minimum of First, Last Names, Company & Email should be entered to avoid duplication.
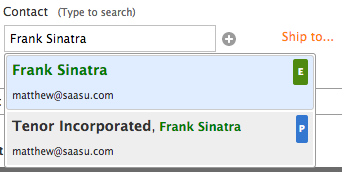
This is how they look when searching where you have 3 contacts associated with a Company:
Now billing can go to a main contact, but shipping goes to another store:

Contact Groups
Export Contacts
You can export (save) the contact list to a number of different file formats suitable for importing into a variety of different accounting, contact management, and email applications (note that you can also connect to email systems such as Mailchimp and Campaign Monitor).
To export a list of Contacts:
- Adjust the list filters to retrieve the list of contacts you wish to export.
- To export active contacts, locate the ‘Export for’ option about the active contacts list and select the application that you wish to import your contacts into from the drop down list. To export inactive contacts check the ‘Show inactive contacts’ check box and use the export function above the Inactive Contacts list.
- Click the Export button next to the ‘Export for’ drop down list.
- A window will pop up with the title ‘Downloading File’ and after a few seconds (possibly longer if you are exporting a large number of contacts) a dialog should appear asking where you would like to save the file. Follow the prompts to save the file to your computer.
Once the file has been saved to you computer you can use your chosen applications’ import feature to import the contacts.
Contact notes are not included in any of the export formats, and not all formats contain all information relating to a contact. The CSV option contains all of the contact information except contact notes and is best used if you wish to make a full backup of your contact list.
De-duplicate Contacts
It seems you have two contacts with the same name setup. There is one ’24 Seven’ which is a Company Contact, and another which is a Regular Contact. At the moment all your purchase invoices (for ’24 Seven’) have been placed against the Company Contact ’24 Seven’. When you are selecting the contact to view purchases in the Purchase List screen, you may be selecting the other ’24 Seven’, hence no invoices are shown.
Best way to distinguish this is to go to Settings screen > click on Contact and select the option Organisation [Last Name, First Name] as the contact format for pick lists. If you want to reallocate the purchase invoices to the Regular Contact ’24Seven’, just go into the Contact and search by Company for ’24Seven’ which only has the Company Name (no First Name or Last Name). Click on the delete icon.
Saasu will give you the option to either set the contact to inactive or reallocate the transactions to another contact. Select Move to Contact > select ’24Seven’ (which is the regular Contact) from the pick list and click on Ok.
Contact Activities
Once you have saved the contact, you can create Activities for the contact and schedule them if required. First, save the contact, then the Activities section will appear on the Contact Edit screen. To add an Activity click add at the top of the Activities list in the Contact Add/Edit screen. A page will load which you can enter a date, a summary and/or details into.
Contact Badges
Denote the type of Contact:
P Contact is a Partner, affiliate or representative of your business. Go to Add > Contact > select Partner checkbox
E Contact is an Employee of your business. Go to View > Employee > Add employee link.