Sales in Saasu represent all the workflow you may need to support your Sales process. Sales reflect an invoice for the goods and/or services you sell to a buyer.
Sales have a workflow
Sales can go through stages – but only if you want them to
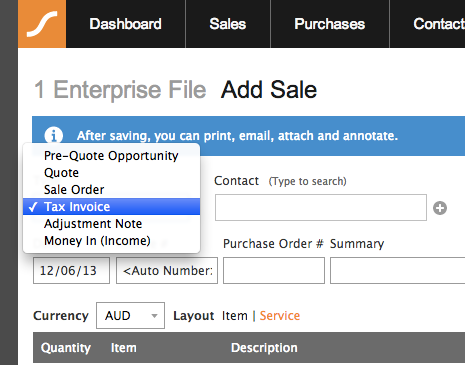
Pre-Quote Opportunity > Quote > Sales Order > Tax Invoice > Adjustment/Credit Note
To update the workflow stage of your Sale:
- Change the Type drop down to the new stage of workflow.
- Update the Date field to be the date this change occurred.
- Click the Save button to accept these changes.
EXAMPLE: When you have supplied goods or services you may change the Sale from “Sales Order” to “Tax Invoice” by selecting it from the Type drop down list.
Once you have selected a type, you cannot change it back up the list. So if you save it as a ‘Tax Invoice‘ you cannot then go back and change it to a ‘Sale Order‘.
What’s in a Sale
- Payment – Sales remain unpaid until you apply Payment(s) to them. Apply a Payment to a Sale when you add the Sale or do this later when you receive your funds from the Add > Sale Payment screen.
- Layout – Item (Time, Inventory) and Service (Labour, Fees, Non-Inventory)
- Type – Specifies the stage the Sale is at and includes Pre-Quote Opportunities, Quote, Order, Sale, Simple Money In, and others depending on your zone
- Workflow – Email all Sale Types as a PDF Print/View as a PDF, Create Shipping Slip, Apply second level Contact (Agent/Sales/Delivery), Print as plain paper, Apply Discounts, Mark to be followed up, Mark as sent to Contact
- Workflow Documentation – Documents, Activities, Notes Internal, Notes External, Voice Messages
Sales Cycle
Saasu supports different types of Sales. Here is an table of when they might be used:
- Tax Invoice – For and organisation registered for GST/VAT. Transaction has taken place between you and the customer
- Sale Invoice – For an organisation not registered for GST/VAT. Transaction has taken place between you and the customer
- Sales Order – Goods have not been delivered/manufactured for the customer. No money owed by the customer yet
- Money In (Income) – Quick cash transactions (eg POS transactions). Used especially when not much paperwork is involved
- Adjustment/Credit Note – A change is required for a Sales/Tax Invoice that has already been issued
- Pre-Quote Opportunity – Indicative estimates for creating a sale that may occur but is not yet confirmed as an order or invoice. Mainly used for tracking and managing sales pipeline
- Quote – Issued informing prices when a request has been made.
Add or edit a Sale
- Go to Add > Sale
- Select the type of transaction this is from the first drop-down.
- Choose a Contact. If you haven’t set up the contact you can use the plus icon to the right of the drop-down to do so.
- Select a Ship to Contact. If the shipping/delivery Contact is different you can choose another Contact by clicking the link.
- Set a Date, Purchase Order # (if you have one from your customer), Summary and a Terms if required.
The Invoice # will auto number by default. To turn this of and do manual numbering go to Settings > Sales to do this otherwise you can fill one in but we recommend auto-numbering. - Choose a Layout above the list of line items. Clicking a blue link changes the layout to that clicked.
- Service layout is for general sales or services.
- Item layout is if you have an inventory business.
- Set the Amounts include Tax – Use this check box to tell Saasu if the amounts you are about to enter include or exclude tax.
- Enter payment details by entering the Date Paid, choosing the Bank Account used and the Amount paid. Leave this area blank if not yet paid.
- Add Tags to allow you to include this transaction in a report filtered for that Tag.
- Add Notes if required and Save the transaction and then option to print or email the transaction become available at the top of the screen.
- Do More allows you to directly a) Save & trigger the ‘Email’ pop-up window, or b) Save and trigger the next page to load a new purchase order based on the sale info, or c) not save the invoice but load a new purchase order based on the sale info :

Other options become available after saving such as Attachments which is the ability to upload files against this transaction. e.g. electronic copy of the PO sent to you from a customer. You can also add Activities if required such as Call notes, Meeting notes and similar.
Payments
You can apply a payment now or come back and apply them later.
- Date Paid – The date the payment was made.
- Date Cleared – The date funds cleared in your bank account.
- Bank Account – The Bank Account, Credit Card or other Account used to process the payment.
- Ref # – Your payment reference number provided by the payment system used.
- Amount – The amount paid which may be the entire Sale amount or just an initial payment. More payments can be added later.
Additional Info
- Tags – Apply a Tag to your Purchase if it relates to something particular in your business (e.g. property investments or a division of your business).
- Notes – Capture internal or external notes (displayed on the Contact Email/Print job)
- Requires Follow-up – Check the Requires Follow-up check box if you need to put further information into your Sale at a later date or as it becomes available.
- Sent to Contact – Check this box if you have sent or emailed the transaction to your contact.
- Additional payments [AFTER SAVING] – Click the Pay link in the Payments listing on Sale Add/Edit screen.
Saasu Business Rules for Sales
- Payments can’t exceed the Sale Amount – After you have applied payment to the Sale you cannot change the total amount of the invoice to less than the total of payments applied. If you have applied payments and you wish to change either of these values you will first need to remove payments for this Sale.
- Changing amounts – will unreconcile a transaction.
- Changing Account code/allocation on line items – won’t unreconcile a transaction.
- Delete not allowed – where other transactions are dependent on this one.
Actions After Saving
- Sale Options – After you have saved the Sale (or when editing) a number of links will appear at the top of the screen:
- Pay – Send you to the payment screen in order to apply a payment to this transaction and others if required.
- Print PDF – This option will open a window and load a PDF version of the invoice (or as an adjustment note) suitable for printing. You can print the PDF document from within this window by clicking on the print icon. You can also save the PDF document to your computer by clicking the save icon.
- Email PDF – This option allows you to email a PDF version of the Sale. You can preview the Sale before sending. You don’t need to have an email account setup on your computer to do this. The PDF document sent is the same format as that created in the View option above. Use a semi-colon to separate multiple email addresses.
- Attachments – Add files to your transaction such as invoices, receipts etc.
- Activities – Add Activities relating to this specific transaction.
- Duplicate – Create a brand new sale invoice, that is an exact copy of the current invoice you have opened. It will copy over: date, contact, summary, line entries. It won’t copy: invoice number, payment information.
Sales List
The Sales list is used for accessing Sales you have previously entered in order to view, print, edit, apply payment, or delete them. To view a list of Sales:
- Use the filters at the top of the screen to select which types of Sales you want to view between a specified date range.
- Choose whether you want Sales to be listed for — All Contacts — or choose a specific Contact from the drop-down list.
- Click the Show button.
- A list of Sales matching your filters will appear.
You can now use the links directly above the list to Add, Pay, View PDF, Delete, List Payments or Export your Sales/Quotes and Orders. Using the check boxes allows you to perform multiple tasks to these Sales such as “View PDF” will allow you to view multiple Sales in Adobe PDF for viewing or printing.
Sales List Icons
Saasu displays icons to the left of transactions where they have the following status:
![]() Sales Order
Sales Order
![]() Sales Quote
Sales Quote
List Actions
- Add – Add a new Sale.
- Pay – Apply a Payment to the selected (checked) Sales.
- View PDF – View and/or Print the selected (checked) Sales from an Adobe PDF file format.
- Delete – Delete the selected (checked) Sales.
- List Payments – List the payments associated with the selected (checked) Sales.
- Export – Export the displayed list to CSV file.
Filtering Your List Using Tags
- Include All Tags – all records that have the tags selected from the tag cloud in the tag picker. So if tag A AND B is selected then all records that have A AND B assigned to them will be returned.
- Include Any Tags – any records that have the tags selected from the tag cloud in the tag picker. So if tag A AND B is selected then all records that have A OR B assigned to them will be returned.
- Exclude All Tags – all records that have the tags selected from the tag cloud in the tag picker. So if tag A AND B is selected then all records having A AND B assigned to them will be excluded.
- Exclude Any Tags – any records that have the tags selected from the tag cloud in the tag picker. So if tag A AND B is selected then all records having A OR B assigned to them will be excluded.
FAQ’s
When I use Ship To Contact how will the addresses appear on my Shipping Slips?
Where an Other/Delivery address exists (the second address option in your contact details screen) then Shipping Slips will always display that address. If not, then the Shipping Slip will use the Mail/Postal Address by default (the first address option in your contact details screen).
How do I edit these Sales or Sales Orders?
To the right of each result listed from your search you can Edit the transaction with the pencil icon.
How do I make a new copy of one of these transactions?
To the right of each result listed from your search you can use the Duplicate icon (plus) to create a new copy of the transaction.